Showing posts with label Portraits. Show all posts

Feb 7, 2012

Asteria Final

Here is my final version of Asteria. I spent some time on the background painting large parts of it with a palette knife. This made a very choppy appearance to the background that just isn't fully noticeable in this image. There is also a little sinking-in on the neck and arm making them appear lighter.

This is a 20in x 16in painting that was done on a panel using the following colors: White, Yellow Ocher, Cadmium Red, Cadmium Orange, Burnt Umber, Ultramarine Blue, and Ivory Black.

Jan 2, 2012

Bing Xun WIP2

I'm having all kinds of trouble photographing this big painting, which is why I am posting so infrequently. The colors are a little off and I can't seem to fix them, even in Photoshop. Particularly the large green looking patch around his mouth. I swear I'll have it photographed by someone who knows what they are doing in the final version.

I'm almost done with the face. There is something oddly round in the lips area. I know that Sargent always says that a portrait is a picture of someone where something is wrong with the mouth, but these lips seem too wrong to let it slide.

Oct 7, 2011

Allison Cartoon


This is the start of my next painting transferred onto the canvas.

Oct 5, 2011

Final Final Sean


This is the actual final final painting of Sean, unvarnished.

Sep 27, 2011

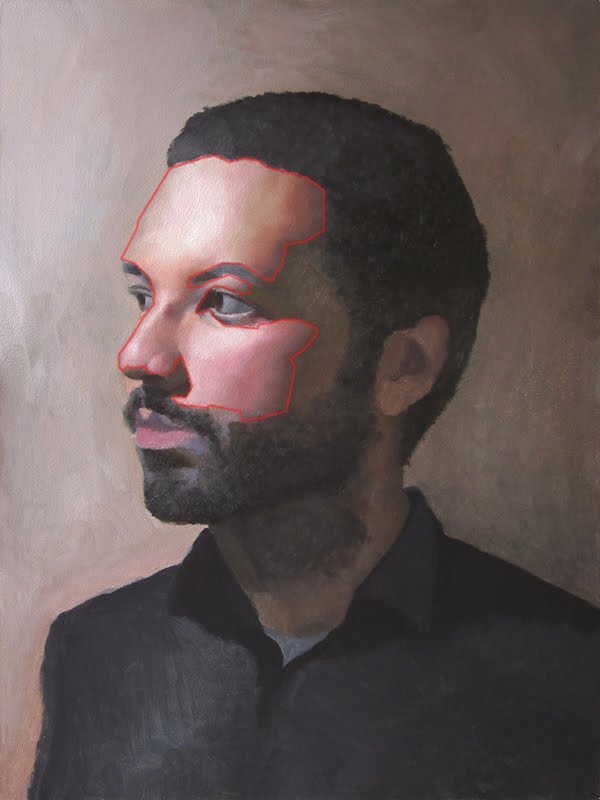
Sean WIP 2

Here is the latest update of this portrait. I worked on the forehead, nose and cheek today (very productive.)

I thought I might do something a little different and post an image outlining the area that I actually worked on so that you can easily see the comparison from the previous photo to this one. Let me know if this is something that you'd like to see more of.

Sep 26, 2011

Sean WIP 1


Here is the latest update of the Sean painting. I mostly worked on the neck, beard, side of face, and hair. I also think that I need to broaden his shoulder on the left by a little bit. I think Sean would like it if I made his shoulders look a little bigger.

I'm still a little undecided about the background. It might still go through some changes, if you have any advice let me know.

Sep 24, 2011

Sean Background Choices


Ok Time to vote on your favorite background.

I've organized them a little better this time. They are in the categories Light, Medium, and Darks and Greenish, Grey, and Red.

I think these are harder for me to choose because I think they all look good and usable.

It kind of looks like a Brady Bunch portrait too.

Sean Dead Color 2


Here is the almost final version of the dead coloring. If you look at it from really far away you can see that all of the major planes of the face are represented. Now I just have to round the forms with oil paint, and get a slightly more subtle color scheme going.

I think I might try to figure out the background in this stage as well. So hopefully my next post will be a couple of different background ideas that people can vote on again.

Sep 22, 2011

Sean Dead Color 1


This is the start of the actual painting process. It is a dead coloring of just the shadow shapes, and the dark shapes like the hair.

I always start working a painting by to the darkest darks first. In this case I painted the black of the hair and the beard first. Then when that is established I can use it to help me judge the proper value and color for the next darkest patches in this case the lighter beard parts, the side of the face shadow, and the shadow on the neck.

Dead coloring is when you have a flat value or color that is kind of the start of your underpainting. It is sometimes called an ebauche.

Sean Transfer

This is the cartoon transferred onto my panel.

I scanned the drawing that I had made. Then I re-sized it in photoshop to fit the canvas that I would be working with. I then printed it out onto another piece of paper and marked up the back of that paper with charcoal. Then I dragged a knitting needle over the lines on the paper to transfer the charcoal onto the panel.

The finished result looks like this, a blank canvas with the lines from the cartoon on it. The charcoal won't be visible in the final painting.

Sep 21, 2011

Sean Poster Study

This is a small study that I did to try and figure out the basic color scheme of the portrait that I am about to paint. I try to figure out the right color scheme before I dive into the big painting. It was painted on a small piece of foam core with acrylic paint.

Sep 20, 2011

Sean Portrait

Here is the start of a new painting that I am working on. It is just the cartoon that will be transfered to my canvas, as soon as I finish making said canvas.

Sep 12, 2011

Finished Portrait: Kristin

Here is an image of this portrait now that it is finished. It isn't varnished yet so it is a little duller in color than it will be once I varnish it. But otherwise this is it.

I'll repost a better image as soon as I varnish this painting. Which could be as much as 6 months from now.

Sep 1, 2011

Portrait Thursday

I really don't like painting ears. One day I will look back once I have perfected how to paint an ear in ten minutes and laugh at my ear painting process of today.

I worked on the neck, ear, eyebrow, and painstakingly painted the hairline around the forehead.

Now all I need to paint is the background and add some touch ups and I will be finished. I'm actually only one day behind schedule for finishing this portrait. Now if I could paint a portrait in a week instead of two weeks then I'd really be in business.

Portrait Wednesday

I spent all of Wednesday painting just the lips and a little of the chin. Oh, also I lowered the corner on the right eye, it was looking a little too Celopatra-ish. It does seem a little impressive to think that six hours of painting lead to only a few minor changes, about a two square inch range of canvas was actually painted on today.

I'm still trying to paint this portrait fairly quickly though. So hopefully i'll finish within the next day or so.

Aug 30, 2011

Background Ideas


I'm trying to decide between which background to use for this painting. If you want to throw in your vote now is your chance. I will be painting this on Thursday so let me know before then if you are swayed by any particular background. You can either e-mail me or comment on this post.

The first box is what the painting currently looks like, minus the clamp of course.

Aug 25, 2011

Back to Blogging

Now that I finally have some free time again I will be able to start blogging regularly.

In the last two days I have been working on this portrait. Hopefully I'll be able to finish it within a respectable period of time. I'm working on timing myself to see just how long it takes to actually complete a painting.

Anyway this is mostly just dead colored, even though it is a more detailed dead color than I would otherwise have done. In the next painting I will limit it to just the major planes of the face. Only the forehead and the nose have been "first painted".

If you have any questions or comments let me know. I'll be much more active in the next few months with my blogging.

Rob, do you have any questions or comments? Also you should send me that portrait of your bother, I'd like to see it.


Unnamed Portrait, note: Color not accurate

May 25, 2011

Another Attempt at Dry-Brush Painting

This is a painting that I recently finished. Because I felt bad for not finishing those other dry-brush drawings of my friends, due to illness, I decided to work on another dry-brush painting. The most interesting thing I learned when working on this was the difference between using mineral spirits as a medium vs using linseed oil. Linseed oil applies the paint in an almost even glaze, and the mineral spirits actually pushed the paint into the grooves of the canvas making a more textured effect.

Similar to the other dry-brush paintings this was painted on a 12x16 canvas board. Entirely done in a dry-brush method of drawings using only rose madder (windsor newton) oil paint.

May 23, 2011

Dry-Brush Paintings of Friends


These are two paintings where I did of friends from school. It was the same setup at the academy as the Thom portrait where we paired off and drew/painted each other. For these I wasn't paired with anyone and had a chance to paint two different people. They are unfortunately unfinished because I became very ill in the last week of the poses and couldn't make it to class.

The sizes are 12x16 and 12x18. They were painted on canvas mounted on panels that I made myself. The paintings are used with a dry-brush method of drawings using only rose madder (windsor newton) oil paint.

May 19, 2011

Double Figure

This last Fall quarter I worked on a drawing at the Academy of Realist Art that was unlike anything I had done before. It was a drawing of two models at the same time. It was surprisingly easier to block in all of the major proportions and features of these models because there are so many horizontals measurements that match up between the two models. Normally you just have one model standing in front of you and nothing but empty space off in either direction for measurements. If for some reason you artists out there get a chance to draw from two models, don't pass it up.

This drawing was done with carbon pencil on Watercolor paper. The type of paper was 300lb hot pressed if anyone is interested. The reason for this was to keep a fairly smooth texture with just a little bit of grit to it.